Three bugs in MSDN Walkthrough: Extending the Solution Explorer Filter

One of the things that I do from time to time is to take a question in the MSDN Visual Studio Integrate or StackOverflow forums about a subject of VSX that I am not very familiar with, and try to investigate and provide an answer. The other day I picked this one about extending the Solution Explorer filter with a custom filter, something that I didn’t know.

The question was that following the MSDN Walkthrough: Extending the Solution Explorer Filter the sample didn’t work for VS 2013 Update 4. I reproduced the issue and after some investigation I concluded that it was a bug in VS 2013, because the version of the Walkthrough for VS 2012 actually worked. I reported it to Microsoft Connect (the report seems to have been deleted now) and actually what was wrong was the MSDN sample, which should use the SVsServiceProvider parameter type (instead of IServiceProvider type) in this constructor:

public FileNameFilterProvider(SVsServiceProvider serviceProvider, ...)

There is now a MSDN feature suggestion to fix the code sample. But the sample has other two bugs:

  • The Utilities.cs class is no longer required, you can use the provided HierarchyUtilities class.
  • The command should not be bound with an event handler in the Initialize() method of the package. Its command guid/id are used as parameters in the SolutionTreeFilterProvider attribute to bind the command with the filter.

MZ-Tools Articles Series: HOWTO: Create a toolwindow WITHOUT a ToolWindowPane class in a Visual Studio package

The usual way to create toolwindows in a package is described in my last post HOWTO: Create a toolwindow with a ToolWindowPane class in a Visual Studio package. While with add-ins only a usercontrol was required, with packages you need the usercontrol and a class that inherits from ToolWindowPane. That is, two files. When I first learned this, I found it somewhat overkill. But when I started to migrate my MZ-Tools add-in to a package, which has quite a few toolwindows, I found it totally overkill. Furthermore, requiring to decorate the package with a ProvideToolWindow attribute for each toolwindow defeats the 3rd strategy that I exposed in Strategies migrating from Visual Studio add-ins to packages, in which a core plug-in provides the features (and therefore the usercontrols for toolwindows) and a host adapter provides the communication between the host (Visual Studio) and the core plug-in. The host adapter is not aware of the features implemented by the core plug-in, and therefore it shouldn’t use specific toolwindows classes or attributes. I am aware that the ProvideToolWindow attribute and the class that inherits ToolWindowPane serve a purpose which was not available for toolwindows created by add-ins: to show automatically when VS is launched the toolwindows that were open in the last VS sessions. So, the initialization of the toolwindow must be contained in a class and not in the “click event” of the command that shows the toolwindow. But it happens that add-ins can provide that functionality too with minimal effort: when unloaded the add-in stores which toolwindows were open and when it is loaded again it shows them. Version 7.0 of MZ-Tools, being an add-in, offered this feature since it was released in 2012.

So, I wanted to create toolwindows in my MZ-Tools package like I was doing in my MZ-Tools add-in. While you can use the automation model (EnvDTE) from a package, alas, the EnvDTE80.Windows2. CreateToolWindow2 method is among the few ones that cannot be used from a package because it requires an EnvDTE.AddIn parameter, that a package cannot provide. Fortunately, the the IVsUIShell interface provides a CreateToolWindow method that can be used from packages. In this new article (equivalent to HOWTO: Create a dockable toolwindow from a Visual Studio .NET add-in) I show how to use it:

HOWTO: Create a toolwindow without a ToolWindowPane class in a Visual Studio package
http://www.mztools.com/articles/2015/MZ2015005.aspx

MZ-Tools Articles Series: HOWTO: Create a toolwindow with a ToolWindowPane class in a Visual Studio package

Creating a package with a toolwindow using the package wizard is easy because the wizard provides you an option to do it:

PackageWizard

However, the steps to create a second toolwindow are not evident. And even if you figure out the steps, knowing what they do may be difficult. And if you come from the add-ins space (where toolwindow creation uses an easier approach), toolwindows of packages is difficult stuff. This question has appeared twice in the StackOverflow forum in the last days.

I have written the following article to explain the stuff generated by the wizard when you request the toolwindow option, how the pieces are connected, and why each piece is required:

HOWTO: Create a toolwindow with a ToolWindowPane class in a Visual Studio package
http://www.mztools.com/articles/2015/MZ2015004.aspx

In my next post/article I will explain a different approach to create toolwindows in a package, without a ToolWindowPane (hence the title of this article).

MZ-Tools Articles Series: BUG: Toolwindow guid attribute value hardcoded in code generated by Visual Studio package wizard

I am these days working on a couple of articles about toolwindows. As you know, the package wizard has an option to create a toolwindow for you that creates a lot of stuff with guids, ids, attributes and so on. One thing that you notice when you learn about packages with commands is that there are duplicated declared Guids for the package guid and command set guid in the .vsct file (<symbols> section, guidVSPackagePkg / guidVSPackageCmdSet guid symbols) and in the Guids.cs file (guidVSPackagePkgString / guidVSPackageCmdSetString constants). That duplication is unfortunate but required, because those two files are compiled by different tools (the .vsct file is compiled by the Vsct.exe tool of the VS SDK and the Guids.cs file is compiled by the C# compiler). However, when you create a package with a toolwindow, you get a third guid value duplicated, but that duplication is not required.

I have documented it in this article:

BUG: Toolwindow guid attribute value hardcoded in code generated by Visual Studio package wizard
http://www.mztools.com/articles/2015/MZ2015003.aspx

and I have opened a bug report at Microsoft Connect:

VS SDK package with toolwindow: constant guid not used in code, hard-coded guid instead
https://connect.microsoft.com/VisualStudio/feedback/details/1138161/vs-sdk-package-with-toolwindow-constant-guid-not-used-in-code-hard-coded-guid-instead

To prevent the problem in the future packages that you create with toolwindows, you can fix the templates by yourself as explained in my article HOWTO: Changing the source code of Visual Studio Package project templates.

And since I have verified that this problem exists in the templates of the package wizard since VS 2005, chances are that if your package uses toolwindows it has the duplicated guid value if you haven’t noticed it.

How Visual Studio names controls when dropped on a form from the toolbox

One popular feature of my MZ-Tools extension allows you to apply custom default properties to a new Windows Forms control (either when it is dropped on a form from the toolbox or on demand clicking a button). It happens that when your extension is notified that a new control has been added to a form or usercontrol with the IComponentChangeService.ComponentAdded event, to guess if the controls is “new” or not (pasted, undo, etc.) is very tricky. One of the checks that I use to guess if the control is “new” is to check if its name has the pattern typename+number(such as “TextBox1”) because it is unlikely that an existing control has remained with the final number. As you know, given a typename such as “TextBox”, in VB.NET the default control name would be “TextBox1” and in C# it would be camel case “textBox1”. This has been working well all these years but last week a customer reported me that using the Janus controls the feature didn’t work. It happens that Janus has controls whose type name is something like “UIButton”, “UIGroupBox”, etc. So, given that typename, which name does Visual Studio assign to a new control? The answer is the following:

  • For C#, it assigns names like “uiButton1” (but not “uIButton1”)
  • For VB.NET, it assigns names like “UiButton1” (but not “UIButton1”)

Since I am the kind of person that likes to know how and why things work, I was curious about how and where Visual Studio applies those naming rules. So, I used .NET Reflector to debug the Visual Studio assemblies. The most difficult part was to guess which assembly to debug and where to put a breakpoint. I succeeded and soon I found the System.ComponentModel.Design.Serialization.CodeDomDesignerLoader class (in the System.Design.dll assembly) that implements the INameCreationService interface whose CreateName(IContainer container, Type dataType) method is used by the Windows Forms designer to generate the name. This method:

1) Takes the name of the type of the control and converts to lower case:

a) The initial character

b) Subsequent characters if they are upper case, until the last upper case character:

string name = dataType.Name;
StringBuilder builder = new StringBuilder(name.Length);
for (int i = 0; i < name.Length; i++)
{
   if (char.IsUpper(name[i]) && (((i == 0) || (i == (name.Length - 1))) || char.IsUpper(name[i + 1])))
   {
      builder.Append(char.ToLower(name[i], CultureInfo.CurrentCulture));
   }
   else
   {
      builder.Append(name.Substring(i));
      break;
   }
}

2) Appends a unique number
3) Calls the code generator to create a valid identifier:

str = this._codeGenerator.CreateValidIdentifier(str);

In turn, this code generator is the Microsoft.VisualStudio.Design.Serialization.CodeDom.VSCodeDomGenerator class (in the Microsoft.VisualStudio.Design.dll assembly) that can use the camel (C#) or VB.NET case (depending on the value of the property __VSHPROPID.VSHPROPID_DesignerVariableNaming of the IVsHierarchy of the designer) converting just the first character (not subsequent ones!)

public string CreateValidIdentifier(string value)
{
   string str = this.innerGenerator.CreateValidIdentifier(value);
   if ((str != null) && (str.get_Length() > 0))
   {
      switch (this.VariableNaming)
      {
         case VSDESIGNER_VARIABLENAMING.VSDVN_Camel:
            return (((char) char.ToLower(str.get_Chars(0), CultureInfo.InvariantCulture)) + str.Substring(1));

         case VSDESIGNER_VARIABLENAMING.VSDVN_VB:
            return (((char) char.ToUpper(str.get_Chars(0), CultureInfo.InvariantCulture)) + str.Substring(1));
      }
   }
   return str;
}

Why to become a Microsoft Visual Studio Industry Partner (VSIP) “Basic” level

Microsoft has been offering the Visual Studio Industry Partner Program (VSIP Program: https://vsipprogram.com)  since many years ago. Initially there was a single level that required a fee, but soon it was offered in three levels (Affiliate, Alliance, Premier), being the first one free (complimentary). Later, the Affiliate level was transformed into the Basic level, still being free. Somehow, I have spent all these years without becoming an “Affiliate” or “Basic” partner, despite developing and selling my MZ-Tools product and being heavily involved in Visual Studio extensibility since 2002. I think there were several reasons:

  • To develop add-ins, the VS SDK was not required (until VS 2013).
  • Even if you develop packages, the VS SDK and documentation is public and free.
  • MSDN provides documentation to develop add-ins or packages. The documentation was not very good at first, but improved over time.
  • You have forums (newsgroups, Yahoo, MSDN, StackOverflow, etc.) to ask questions and get technical support.
  • You have also blogs from the VS team to learn new things about Visual Studio (or TFS or Visual Studio Online).
  • Soon I became a provider of technical help for add-ins in forums and my blog and articles, complementing the official documentation ;-). I have entered the VS SDK packages area very late (forced by VS 2015).
  • You have Microsoft Connect to report bugs. I have reported dozens and many have being fixed by Microsoft before the RTM versions of Visual Studio.
  • Being an MVP since 2004, I have access to restricted information and private VS CTPs and previews from Microsoft.
  • I do VSX development, blogging and forum support at spare time (I have an unrelated daily job), so I miss some things.
  • Being a developer at heart, I did not appreciate enough the marketing side of the VSIP offering (my fault).
  • There were at least two years (2008 and 2009) when the videos of the annual VSIP Summit conference were publicly available after the event.
  • And Microsoft is now a much more open company than it was a decade ago, even embracing open source, so you receive much and frequent information.

So, why did I join for the “Basic” level of the VSIP program last week? It all started some weeks ago when I became fully DPI-aware. I have been fixing many DPI issues of MZ-Tools 7.0 for the next version 8.0 (to be launched with VS 2015) but there was an area that I didn’t know how to fix it: the high resolution images in toolbars, menus and context menus. I was aware that the new Visual Studio 2015 will provide high resolution images because it was stated in the release notes of CTP 3. But which would be the mechanism for extensions to provide them? This has not been documented yet in MSDN or the Visual Studio blog, so I thought that the answer would be inside the VSIP program. Specifically, I thought it would be in the videos of the VSIP Summit conference, which are no longer public since 2010. So, I registered for the basic level of the VSIP program, and I was right. The information is under Non-Disclosure Agreement (NDA) so I can’t publish it here, but if you register for the Basic level, and (once approved by Microsoft in 72 hours) you locate the Summit 2014 presentations (under Resources > Additional Resources, or in the August 2014 newsletter), there is one about Visual Studio extensions and high DPI displays.

So, if you are a small developer or ISV with a Visual Studio extension, to summarize and encourage you to become a VSIP partner “Basic” level for free, these are the valuable benefits that you get:

  1. Access to the private VSIP Summit presentations (PowerPoint and videos), even from the past year.
  2. The monthly newsletter.
  3. The partner directory listing (you can’t use the Visual Studio partner logo, though, that requires the Alliance level).

Visual Studio extensions and DPI-awareness

This first thing that I noticed (very horrified) when I installed Visual Studio and my MZ-Tools extension in the new MacBook Pro 13″ Retina that I purchased last month was that at 100% scaling (96 Dpi) everything looked very tiny and at 150% (144 Dpi) or 200% (192 Dpi) scaling MZ-Tools looked horrible with very wrong layouts. In some Visual Studio versions (such as VS 2008) it looked better. And since MZ-Tools also works with the VBA editor and VB6/VB5 I also tested with different results. At that point I became DPI-aware and read everything I found about Windows and DPI, which is a lot because it is quite complex and tricky. So, if you are not DPI-aware yet, I urge you to buy a retina external monitor or a retina laptop  so that you can set at least 200% scaling (better than 150% scaling) to do some tests and fixes and avoid a painful experience. A “large” monitor such as the one of the iMac 27″, that I also own, doesn’t qualify if it is not the new retina model. In the future, especially with Visual Studio, two screens would be needed for better tests with “per-monitor DPI” awareness introduced by Windows 8.1 once Visual Studio supports it.

First, I will introduce some resources that explain better than me DPI-awareness and Windows OS support:

To summarize:

  • Windows XP used a pseudo-DPI scaling (fonts and some other UI items)
  • Windows Vista (and Windows 7 and Windows 8) introduced true DPI-scaling with the following notes:
    • The same DPI is used in all the monitors of a computer (this is called “system DPI”).
    • An application must declare through a manifest (embedded in the executable or in an .exe.manifest file, or even by code) its DPI-awareness.
    • If an application lacks the manifest, or states that it is not DPI-aware, then the OS scales the application as a bitmap (something called “DPI virtualization”) while the application still thinking that is running at 100% scaling (96 dpi).
  • Windows 8.1 introduced “per-monitor DPI”, where each monitor can have a different DPI and an application is notified of a change in the DPI when moved to another monitor, so that it can accommodate the new display.

Given that your extension is hosted in an application (Visual Studio), you don’t have the chance of declaring anything about the DPI awareness of your extension, you are conditioned by the DPI-awareness of the Visual Studio version that is hosting your extension.

To know the DPI-awareness of an executable (such as devenv.exe of Visual Studio) you can use these approaches:

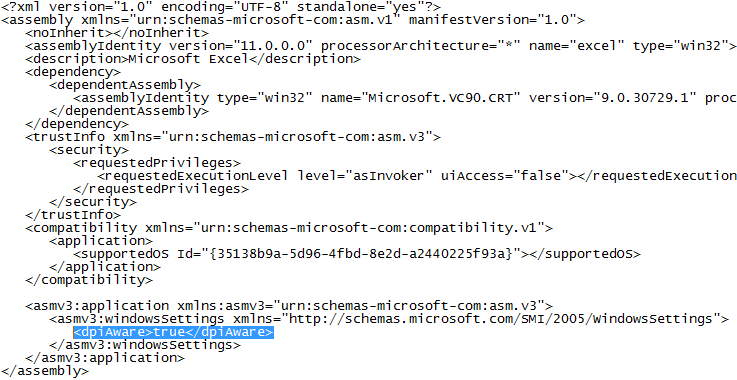
  • At design-time, you can see if the .exe file is accompanied by an .exe.manifest file (this is the approach used by Office applications):

DPIAwareInArchiveManifest

ArchiveManifest

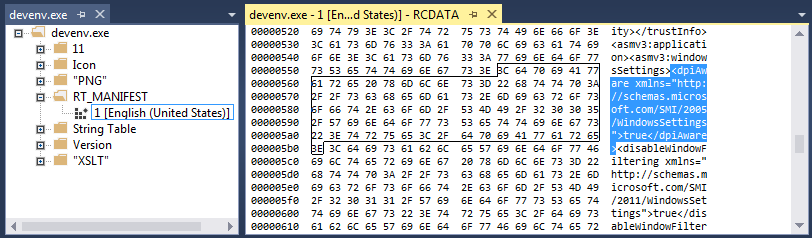
Or you can open the .exe file with Visual Studio (“File” > “Open” > “File…” menu) and search for a “RT_MANIFEST” resource (this is the approach used by Visual Studio):

DPIAwareInEmbeddedManifest

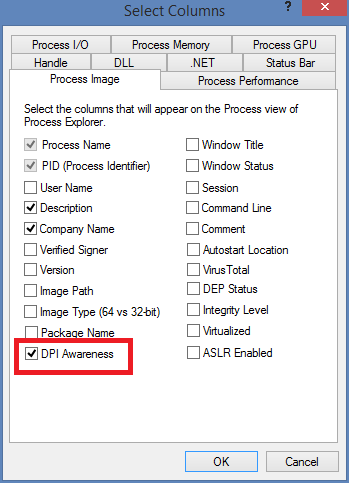
  • At run-time, you can use Process Explorer and configure it to show the “DPI Awareness” column:

DPIAwarenessColumn

The results are as follows on Windows 8.1:

DevenvAwareness

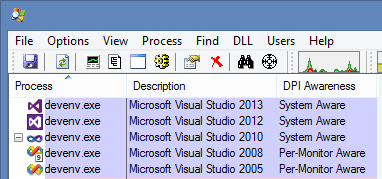
  • Visual Studio 2005 and 2008 don’t state DPI-awareness in any manifest (embedded or otherwise) but sometimes are shown in Process Explorer as “Per-monitor aware”, for some reason that I haven’t found yet. Certainly they are not “Per-monitor DPI-aware” (not even “System DPI-aware”).
  • Visual Studio 2010 and higher state “System DPI-awareness” through an embedded manifest (but not per-monitor DPI awareness on Windows 8.1).

The bottom line is that since Visual Studio 2010 your extension must be at least “System DPI-aware” and even earlier for that issue with VS 2005/VS2008. Microsoft enhanced the DPI handling in VS 2013, and even more with high-resolution icons in VS 2015.

When ensuring DPI-awareness, you need to address three aspects:

  1. Once the form or toolwindow is scaled, the layout of controls must be correct, that is, without overlapping controls or clipping out of boundaries.
  2. The size of controls that show images must be scaled according to the actual DPI. Visual Studio does this with the toolbars and menus, but you must do it for the rest of your user interface. This includes graphic buttons on your own toolbars, pictureboxes, images on treeviews, listviews, etc. For example, what at 100% scaling measures 16×16 pixels must measure 32×32 pixels at 200% scaling. At this point we are talking only about resizing the container stretching the contained image. This point and the previous one guarantee that your extension doesn’t have usability issues with clickable controls at high scaling (such as tiny toolbar buttons or checkboxes on treeviews/listviews)
  3. Ideally, you should provide high-resolution images for scaled containers of images of the previous step. That is, if a button holds a 32×32 image at 200% scaling, you should provide a 32×32 image and not a stretched 16×16 image. If you are a perfectionist and have a lot of time you should provide the following dimensions for the images:
    • 16×16 pixels at 100% scaling (96 Dpi)
    • 20×20 pixels at 125% scaling (120 Dpi)
    • 24×24 pixels at 150% scaling (144 Dpi)
    • 32×32 pixels at 200% scaling (192 Dpi)
    • 40×40 pixels at 250% scaling (240 Dpi)
    • etc.
      In practice, you can compromise providing just 16×16 and 32×32 resolutions and stretch images for resolutions that you don’t provide.

Now, how to provide DPI-awareness in your extension depends on the technology that you are using: it is said that it is easier with Windows Presentation Foundation (WPF) but if you created your extension back in VS 2005 chances are that you are still using Windows Forms. The good news is that you can achieve excellent DPI-awareness with Windows Forms, even with .NET Framework 2.0. I say this because in newer versions of .NET Framework (since 4.5) a Windows Forms app can opt-in for better DPI handling.

I have found several issues in the last weeks that I have been working on this and I have resolved all of them to my complete satisfaction:

  • First of all, ensure that all the designers of your forms and usercontrols include the following two lines. This is especially important if your extension has evolved from an add-in created back in VS.NET 2002/2003 because .NET Framework 1.0 / 1.1 used an inferior scaling mechanism with other deprecated properties:
this.AutoScaleDimensions = new System.Drawing.SizeF(6F, 13F);
this.AutoScaleMode = System.Windows.Forms.AutoScaleMode.Font;
  • You may need to scale some controls at run-time, depending on how they are added to the user interface.
  • You may need to adjust at run-time some widths and heights, especially if you are using the SplitContainer control.
  • You need to scale hard-coded dimensions in pixels that you may be using in your code for performing layouts at run time.
  • You need to scale pictureboxes according to the actual DPI.
  • You need to provide 32×32 size imagelists (either with 16×16 scaled images or, preferably, 32×32 native images)
  • You need to adjust the ItemHeight property of treeviews.
  • You need to adjust the dimensions of toolstrip buttons with the ToolStrip.ImageScalingSize property.
  • Avoid the use of the StateImageList property of the TreeView control, because in .NET Framework 4.0 or lower it’s always 16×16, and in .NET Framework 4.5 or higher the application can opt-in for a DPI-aware StateImageList, but your extension cannot. Instead you can use the Win32 API for TreeView controls to set the state imagelist and image index for nodes, as it was the case in .NET Framework 1.0 / 1.1, whose TreeView control lacked the StateImageList property.
  • You need to adjust the width of the columns of the listviews because they are not adjusted automatically in high DPI scaling. I had already coded this (because I hate columns that don’t adjust automatically to the contents).
  • The glyph of Radiobutton and Checkbox controls is scaled automatically if visual styles are enabled, as it happens with Visual Studio. For some reason, in the VBA editor of Office they are not enabled so a call to the System.Windows.Forms.Application.EnableVisualStyles method is required.