Running Visual Studio or setups with DPI virtualization (DPI-unaware) on high DPI displays

This is another cross-post from my other web site, Visual Studio Resources, that may be of your interest as a VSX developer if your extension uses Windows Forms or .NET 2.0/3.0/3.5 tooling (included in WinSDK 7.1, but not in WinSDK 8.0 or higher):

The high-DPI (retina) displays pose some problems to us developers, so that we need to modify our applications to make them DPI-aware. In the post Visual Studio extensions and DPI-awareness I explained how I became DPI-aware and the painful experience to make my application (an extension for Visual Studio) DPI-aware. If you don’t know about DPI-awareness, start with that post.

In this post, I am going to explain how to do the opposite: to make an application that claims to be DPI-aware run as DPI-unaware. Technically this is called DPI virtualization mode, where the application thinks that it is running at 96 dpi and the Windows OS scales its window as a bitmap to the proper size. The result is that the application appears blurred but it’s usable, while in DPI-aware mode it has problems (by the way, if your problem is the opposite, see the Knowledge Base article Some desktop applications may appear blurred on high-DPI displays).

I have found a couple of scenarios where I have wanted some applications to become DPI-unaware even at the cost of appearing blurred on my retina display:

The first case is designing Windows Forms with Visual Studio. Modern versions of Visual Studio (2015, 2017) are truly DPI-aware but they alter the designer files of Windows Forms, so you need to either use a non-retina display, or to use a virtual machine with retina display disabled or to set the retina display scaling to 100% instead of 200% or 250%, which makes everything tiny and unreadable. But there is a better solution: you can make Visual Studio (or any process) DPI-unaware adding the following registry entry:

[HKEY_LOCAL_MACHINE\SOFTWARE\Microsoft\Windows NT\CurrentVersion\Image File Execution Options\devenv.exe]
"dpiAwareness"=dword:00000000

(Thanks to Tanya Solyanik, from Microsoft, that provided me this trick).

The other case is an application that claims that it is DPI-aware, but it is not really. For example, the setup of the Windows SDK 7.1 (you may download it as winsdk_web.exe, but once executed the process is really sdksetup.exe). You can see here in Process Explorer that it claims that its DPI-awareness is “System Aware”:

But when executed on a retina display, it becomes tiny and truncated:

When creating the registry entry above for SDKSetup.exe:

then it displays with the correct size and without truncations, that is, usable (although blurred):

I hope this post helps if you are in one of those two scenarios.

It’s time to change the VSIX manifest of your extension to v3 for Visual Studio 2017 compatibility

I still see, even as today Jan 10, people asking why you get this error when trying to install your extension on Visual Studio 2017 RC:

“The following extensions are not compatible with Visual Studio 15. Installation may cause Visual Studio to be unstable”:

or this other one when you try to upload the extension to the Visual Studio Gallery:

“This extension targets Visual Studio 2017 but was not build with an up-to-date VSSDK. Please make sure to update your references and try uploading again. Note: you’ll also need to add Prerequisites to your extension.vsixmanifest.”:

In both cases, the answer is the same: you have just updated the extension.vsixmanifest of your Visual Studio 2015 extension to add 15.0 (for Visual Studio 2017):

 <Installation>
 <InstallationTarget Id="Microsoft.VisualStudio.Community" Version="[14.0, 15.0]" />
 </Installation>

But that is not enough to add compatibility for Visual Studio 2017. Even worse, some people wonder if you can live ignoring those warnings.

The short answer to make an extension compatible with Visual Studio 2017 is the following:

  • You need to build it with Visual Studio 2017, you cannot use Visual Studio 2015 (at least at this time). Updated (Feb 7): actually you can build with VS 2015. Updated (Mar 3): as explained in the FAQ entry Can I build a VSIX v3 with Visual Studio 2015?
  • You need an updated pre-release VS SDK (via NuGet). Updated (Feb 7): The Nuget VSSDK 15.0 is no longer prerelease. This VS SDK generates two additional files (catalog.json and manifest.json) inside the output .vsix file (which being a .zip file really, you can rename and unzip to inspect) that were not present in the .vsix generated by the VS 2015 SDK.
  • You need to update the InstallationTarget range in the extension.vsixmanifest (likely this is the only thing that you have done).
  • You need to convert the extension.vsixmanifest to version 3, which is the only version that Visual Studio 2017 accepts (and the Visual Studio Gallery for extensions targeting Visual Studio 2017). Version 3 is backwards compatible with version 2, which means that all fields are the same (including the Version=”2.0.0″!). The only difference is that version 3.0 adds a mandatory section for the prerequisites. At the very least you need to specify the Visual Studio Core Editor (Visual Studio 2017 has an editor to enter values in a friendly way):
<Prerequisites>
   <Prerequisite Id="Microsoft.VisualStudio.Component.CoreEditor" Version="[15.0.25904.2,16.0)" DisplayName="Visual Studio core editor" />
</Prerequisites>

The long answer, with links to resources is on my post Visual Studio 2017 RC announced. Extensions need some changes, and for advanced topics read Some implications of the new modular setup of Visual Studio 2017 for VSX developers.

Now, once that you have assumed that you need a v3 VSIX manifest for Visual Studio 2017, you may wonder how to support multiple instances of Visual Studio from VS 2010 to VS 2017 with the same .vsix: you can’t, because VS 2010 only accepts manifest v1, while VS 2012, VS 2013 and VS 2015 accept manifest v1, v2 or v3 (backwards compatible with v2), and VS 2017 only accepts manifest v3. You need two .vsix files. So, you have two choices:

  • Create a VSIX with manifest v1 for VS 2010, VS 2012, VS 2013 and VS 2015, and another VSIX with manifest v3 for VS 2017. This is the most suggested approach, but there is a better one.
  • Create a VSIX with manifest v1 for VS 2010, VS 2012 and VS 2013, and another VSIX with manifest v3 for VS 2015 and VS 2017. Why? Because VS 2015 introduced APIs not available in previous versions that you can use in VS 2015 and VS 2017 to make your extension a better citizen, such as How to: Use AsyncPackage to Load VSPackages in the Background and How to: Use Rule-based UI Context for Visual Studio Extensions.
  • Updated (Feb 7): if you are not targeting VS 2010 but only VS 2012 and higher, you can have a single VSIX using v3 for VS 2012, 2013, 2015 and 2017.

To get support from Microsoft, you can become a Microsoft Visual Studio Industry Partner (VSIP) “Basic” level for free and get access to workshops explaining the migration process, or you can use Gitter (Microsoft/extendvs), where people from Microsoft and other VSX developers answer questions, the MSDN Visual Studio Integrate Forum that I visit daily, or StackOverflow. And if you find bugs or want to provide suggestions to Microsoft, you can also send feedback to Microsoft about Visual Studio Extensibility through several ways.

Licensing the Visual Studio family of products (or using them for free)

This is a cross-post from my other web site, Visual Studio Resources (no longer available). If you as individual or your team are starting to develop paid or open source extensions for the Visual Studio family of products, the first thing is to know which products you can use legally.

A common question that you may have about using legally Visual Studio is which are your options. As always happens with licensing, it is a somewhat complex subject with quite a lot of options, but the good news is that if you are an individual developer or a small team, you can use all the family of Visual Studio products for free. I am not a lawyer, so validate all this information with a lawyer or legal department. The purpose of this post is to provide you the pointers to the different options.

The first thing to know are the products and editions:

  • Visual Studio
    • Visual Studio Community Edition
    • Visual Studio Professional Edition
    • Visual Studio Enterprise Edition
  • Visual Studio Code
  • Azure DevOps (formerly Visual Studio Team Services, VSTS)
  • Azure DevOps Server (formerly Team Foundation Server, TFS)
    • Azure DevOps Server
    • Azure DevOps Server Express Edition

Licensing Visual Studio

Visual Studio Professional Edition and Enterprise Edition are paid versions, while the Community Edition is free for some scenarios.

You can compare the three editions on this page:

Compare Visual Studio Offerings

For Visual Studio Professional Edition and Enterprise Edition, you can compare the purchase options (Standalone for the Professional Edition, or Standard / Cloud subscriptions for both editions) on this page:

Visual Studio Purchasing Options

Visual Studio Community Edition is free under these scenarios (see Visual Studio Community):

  • For individuals: Any individual developer can use Visual Studio Community to create their own free or paid apps.
  • For non-enterprise organizations (meaning those with ≤250 PCs and ≤$1 Million US Dollars in annual revenue): Up to five users can use Visual Studio Community.
  • For enterprise organizations (meaning those with >250 PCs or >$1 Million US Dollars in annual revenue): Visual Studio Community can be used for the following scenarios:
    • In a classroom learning environment
    • For academic research
    • For contributing to open source projects

The exact details for the license terms of the latest Visual Studio versions of the Community edition are here:

MICROSOFT SOFTWARE LICENSE TERMS. MICROSOFT VISUAL STUDIO COMMUNITY 2015

MICROSOFT SOFTWARE LICENSE TERMS. MICROSOFT VISUAL STUDIO COMMUNITY 2017

MICROSOFT SOFTWARE LICENSE TERMS. MICROSOFT VISUAL STUDIO COMMUNITY 2019

Licensing Visual Studio Code

Visual Studio Code is both open source and free. The detailed license is here:

MICROSOFT SOFTWARE LICENSE TERMS. MICROSOFT VISUAL STUDIO CODE

Licensing Azure DevOps (formerly Visual Studio Team Services, VSTS)

Azure DevOps distinguishes three kind of users:

  • Free Stakeholders: you can have unlimited free users with “Stakeholder” access level, with a limited number of features (create, edit and search work items, view backlogs and boards, approve releases, etc.). This access level is not intended for developers (they cannot manage source code in private repositories).
  • Free Users with “Basic” access level.  These can do more things and this level is intended for developers. You can have up to 5 free users with “Basic” access level.
  • Paid Users: If you need more than 5 free users for your team, you need to pay for more users, which get more things than the free users with “Basic” access level, such as a Team Foundation Server CAL (Client Access License) to access an on-premises Azure DevOps Server. For details see: Azure DevOps Server Pricing.

Licensing Azure DevOps Server (formerly Team Foundation Server, TFS)

If you don’t like the idea of using Azure DevOps on the cloud, you can use it on-premises with Azure DevOps Server:

  • For individuals or teams up to 5 developers, you can use the free Azure DevOps Server Express, that you can download here.
  • For teams with more than 5 developers you need to pay for the additional developers as explained here: Buy access to Azure DevOps  or Azure Test Plans.

Finally, the ultimate guide for licensing Visual Studio, Azure DevOps or Azure DevOps Server is this white paper:

Visual Studio Licensing White Paper (May 2019)

Updated (Jul 9, 2019): updated links and names for the latest Visual Studio versions and products

VS 2017 RC breaking things: the strange case of MZ-Tools 8.0 not changing user interface language

I received four days ago a problem report from a German user of my MZ-Tools add-in for VBA, explaining that after updating to the last build 8.0.0.120, the language of the user interface was always English, despite MZ-Tools being configured to use the language of the Regional Settings, and being these German. Nobody else had reported this and I was unable to reproduce it.

At first I thought that there was a problem in the logic detecting the language of the Regional Settings, but after some verification that was not the case, the problem happened also selecting German directly (and the logic to detect the language of the Regional Settings hasn’t changed for years).

Then I requested him to send me his files and settings. I copied them to my computer but I was unable to reproduce the problem, German was used as language.

Then I sent him all the builds between the last working build and the last (failing) build, so we determined which exact build introduced the problem.

Using source control I could determine that the first failing build used a somewhat different approach to generate the resource dlls used by MZ-Tools, because I am these weeks migrating from a custom builder for MZ-Tools to 100% MSBuild. But the new approach seemed very fine to me, so it should be something else, and I had a suspicion.

In the past years MZ-Tools used an embedded xml file with all languages, and while it worked fine, in recent times I have a tendency to adopt standard Microsoft approaches, so I switched to .resx/resource dlls (despite my dislike for file proliferation). Soon I became familiar with an issue with .resource.dll files: if for some reason the Common Language Runtime (CLR) of the .NET Framework fails to load them, the failure is silent and the user interface defaults to English. This happened in the case that I described in the post The strange case of localized resources not being loaded, where I was failing to re-sign the resource dlls after obfuscating and re-signing the main assembly. Since then I have learned more about obfuscation and signing and I no longer use delay-signing.

Notice that when resource dlls fail to load, three errors are happening:

  • Something is generating bad resource dlls (that can’t be loaded by the CLR).
  • PEVerify.exe is not being used to verify the resource dlls during the MSBuild script, or it is not reporting the problem.
  • The error is not detected at runtime (it’s a silent error), although it can be detected with the Assembly Binding Log Viewer (fuslogvw.exe).

Rather than focusing on the first item to solve the problem, I like to focus first on providing early detection of problems. In my case I noticed that my MSBuild script was not using PEVerify.exe to verify the resource dlls (it was used only against main assemblies), so I added that verification to the build script. Strangely, the verification was successful. But I noticed that I was using the $(TargetFrameworkSDKToolsDirectory) MSBuild variable, that uses .NET Framework 4.0. MZ-Tools 8.0 for VBA is built against .NET Framework 2.0, so I changed the MSBuild script to use the peverify.exe tool of .NET Framework 2.0. And then, finally, I got this:

“The assembly is built by a runtime newer than the currently loaded runtime, and cannot be loaded.”

What? I used the disassembler ildasm.exe, and surprise, surprise, the MZTools8PlugIn.resources.dll was referencing mscorlib version 4.0, despite MZTools8PlugIn.dll being targeting .NET Framework 2.0:

mscorlib4

I reproduced the problem creating a Class Library project and adding a resource file. What could be causing this? Quickly I thought about other thing that changed on my computer in the last weeks: I installed Visual Studio 2017 RC to add support for that IDE in MZ-Tools 8.0 for Visual Studio. Latest builds of MZ-Tools are compiled with Visual Studio 2017 RC, but I noticed that the problem also happened using Visual Studio 2015 on the same computer. I was quite sure that this was not the case in the past, as I verified on a second computer with Visual Studio 2015 without Visual Studio 2017 RC. So, this is a problem introduced by Visual Studio 2017 RC, and I have reported it here:

When VS 2017 RC is installed, resources.dll is generated from .resx file using mscorlib 4.0 even when project targets .NET 2.0

I don’t have a workaround yet (other than using a computer without Visual Studio 2017 RC), but at least now I know the culprit and I have a MSBuild script that will detect all future cases at build time.

The last piece to be explained is why I was unable to reproduce the issue on my computer. The reason is that the user is using Windows 7, where MZ-Tools 8.0 for VBA runs on the installed .NET Framework 2.0 (and therefore cannot load .NET 4.0 resource dlls), while I am using Windows 10, where MZ-Tools 8.0 for VBA runs on the installed .NET Framework 4.0, which is happy to load .NET 4.0 resource dlls.

Some implications of the new modular setup of Visual Studio 2017 for VSX developers

As you may already know, VS 2017 (formerly VS “15”) introduces a couple of very welcomed changes:

  • It provides a new modular setup that allows you to decide which tools (“workloads”) you want to install and, most importantly, which ones you don’t want at all. The consequence is that installing VS 2017 is much, much faster (unless you install a lot of workloads, of course). This suggestion had almost 2,000 votes on UserVoice. For VSX developers like me that already have six versions of Visual Studio installed (from VS 2005 to VS 2015) on the main dev machine (not counting isolated installations on virtual machines) and know how painful each installation is, this is big news.
  • Visual Studio 2017 allows to coexist several editions on the same machine. So, you can have VS 2017 Community Edition, VS 2017 Professional Edition and VS 2017 Enterprise Edition. This may not be very useful for end users, but for VSX developers it allows you to test your extension (which needs to declare the minimum supported edition in the Vsix manifest) on the three editions on the same computer. Here you can see my computer with the Community edition installed (notice the familiar “Common7” folder inside the “Microsoft Visual Studio\2017\Community” folder):

vs2017communityinstallation

If you want the details about the new setup experience, the official posts from Microsoft about this on the Visual Studio blog are the following:

Faster, Leaner, Focused on Your Development Needs: The New Visual Studio Installer

Visual Studio “15”: Installing Just What You Need

Anatomy of a Low Impact Visual Studio Install

On the Road to Release: Redesigning Visual Studio Installation

Visual Studio “15” Preview 4

But not only that. Visual Studio 2017 is also much more isolated and resilient. It doesn’t install Visual Studio assemblies in the Global Assembly Cache (GAC) and it doesn’t use for the most part the main Windows Registry. In the past (since VS 2010, see my post The strange case of the registry key HKEY_CURRENT_USER\Software\Microsoft\VisualStudio\10.0_Config\Projects\{C8D11400-126E-41CD-887F-60BD40844F9E}), Visual Studio redirected HKEY_LOCAL_MACHINE\Software\Microsoft\VisualStudio\<version> to HKEY_CURRENT_USER\Software\Microsoft\VisualStudio\<version>_Config, to allow installation of extensions through .pkgdef files without admin rights, etc. Now, VS 2017 uses its own private registry. See how empty is the regular HKEY_CURRENT_USER\Software\Microsoft\VisualStudio\15.0 key on my machine and notice that there is no 15.0_Config key:

vs2017config

Instead, the VS 2017 private registry is stored in your AppData folder:

privateregistry

Fortunately, you can use regedit.exe to load a private hive. You need to select the HKEY_USERS node, and click the File > Load Hive… menu. You select the privateregistry.bin file, give a name to the hive (I entered “VS2017PrivateRegistry”) and now you can see the 15.0<id>_Config key populated as usual (note: use File > Unload Hive when done):

vs2017privateconfig

Hopefully all this isolation and resilience can prevent the problems that I suffered with VS 2015 when my Surface Pro 4 crashed at boot time due to a buggy antivirus update (I never recovered VS 2015).

So far, so good, but all this will cause some issues to VSX developers. I adapted my MZ-Tools extension to run in Visual Studio 2017 some weeks ago and I am these days migrating my old .NET-based custom builder for MZ-Tools to fully embrace MSBuild and hopefully to use a separate Windows Azure build server, better environment/workspaces isolation, etc.

The changes above can cause some trouble:

  • The location of devenv.exe for Visual Studio 2017 has changed, and can be several of them.
    As explained above, you can have now several Visual Studio 2017 installations on your machine. In the past (until Visual Studio 2015) you could query the HKEY_LOCAL_MACHINE\SOFTWARE\WOW6432Node\Microsoft\VisualStudio\14.0, InstallDir entry, to get the (only) installation folder for Visual Studio (2015). Now, there can be several Visual Studio 2017 installation folders (Community, Professional, Enterprise), and you cannot query the registry directly. Instead, the official approach is to use some interop assemblies (Microsoft.VisualStudio.Setup.Configuration.Interop) provided by Microsoft to enumerate the Visual Studio 2017 installations. See the post Changes to Visual Studio “15” Setup and the Microsoft/vs-setup-samples samples on GitHub. Of course, for your own use on your own build script you can hardcode paths ;-).
  • External processes cannot read Visual Studio 2017 registry entries directly.
    Extensions can read Visual Studio 2017 registry entries from the private registry in a transparent way, because being dlls, they run in-process with devenv.exe and leverage the redirection provided by Visual Studio. But out-of-process executables or scripts need to use the  RegLoadAppKey function. See the section “Change: Reduce registry impact” in Breaking Changes in Visual Studio 2017 extensibility.
  • The location of MSBuild for VS 2017 has changed, and can be several of them.
    In the past (until Visual Studio 2015), the path of MSBuild was “C:\Program Files (x86)\MSBuild\<version>”, where <version> was “4.0”, “12.0” (VS 2013), “14.0” (VS 2015). There is no “15.0” folder there for VS 2017. Instead, MSBuild for VS 2017 is installed in the folder “C:\Program Files (x86)\Microsoft Visual Studio\2017\<edition>\MSBuild\15.0”, where edition can be “Community”, “Professional” or “Enterprise”. Again, for your own use on your own build script you can hardcode the path, but if you want to use a more proper way, you need to get the VS 2017 installation folder as explained above and concatenate “MSBuild\15.0”. Or you can wait until Microsoft releases a document about how to resolve MSBuild location (they are working on it and now that MSBuild is open source you can follow the progress on GitHub). BTW, you can download the MSBuild Tools for Visual Studio 2017 RC here.
  • The location of tf.exe (Team Explorer command-line) has changed.
    In the past, for Visual Studio 2013 and 2015 it was stored in the folder C:\Program Files (x86)\Microsoft Visual Studio <version>\Common7\IDE. For Visual Studio 2017, it is installed in the folder of the Team Explorer extension (C:\Program Files (x86)\Microsoft Visual Studio\2017\<edition>\Common7\IDE\Extensions\<random folder>). Fortunately, there is a shortcut in the folder C:\Program Files (x86)\Microsoft Visual Studio\2017\Community\Common7\IDE\CommonExtensions\Microsoft\TeamFoundation\Team Explorer that point to that location. Did I mention that there can be several editions of Visual Studio 2017 installed?
  • The VsWebSite.Interop.dll automation file is not included in the Core Editor and causes FileNotFoundException.
    The EnvDTE automation assemblies don’t provide extensibility for all kind of projects (for example, you cannot get project references for VB/C# projects with that assembly). For VB/C# projects, you need the VSLangProj.dll family of assemblies. Both EnvDTE and VSLangProj are included by default with the Core Editor of Visual Studio 2017 and therefore your extension will work just declaring Visual Studio Code Editor as dependency in the new Vsix Manifest editor for version 3:vs2017coreeditordependency
    Those assemblies are also valid for Web Application projects. However, Visual Studio 2005 introduced Web Site projects, that lack a project file and Microsoft provided the VsWebSite.Interop.dll family of assemblies to deal with that kind of projects using automation (for example, to get their references). Alas, the VsWebSite.Interop.dll assembly is not included in the core editor, and therefore each time that a method of your extension uses its types (when the method is JIT-compiled) will cause FileNotFoundException. For example a method with this code:
foreach (EnvDTE.Project project in solution.Projects)
{
   langProject = project.Object as VSLangProj.VSProject;
   if (langProject != null)
   {
   ...
   }
   else
   {
       webProject = project.Object as VsWebSite.VSWebSite;
       if (webProject != null)
       {
       ...
       }
   }
}

I reported this to Microsoft through private channels and on Microsoft Connect (VsWebSite.Interop.dll extensibility assembly not installed by Visual Studio core editor) and the only answer so far has been that the extension must declare a dependency on the Microsoft.VisualStudio.WebTools (which installs that assembly), but that is not a solution for me since:

1) That component installs tons of files related to web development, not only VsWebSite.Interop.dll. The user should not be forced to install web-related stuff (project templates, etc.) that she doesn’t require and that would dirty the Visual Studio installation for that simple extension to work.

2) Even if only VsWebSite.Interop.dll was installed by that Microsoft.VisualStudio.WebTools component it would be annoying for users to install that component.

It is a good thing that Microsoft uses EnvDTE / VSLangProj internally and therefore they needed to include them in the Core Editor. Otherwise they wouldn’t be there either. You know that I am not very fan of EnvDTE/VSLangProj although I still use them very heavily (Microsoft has insisted that they are not going to disappear or be deprecated).

Fortunately, there is a workaround, that is what I used. I refactored the methods of MZ-Tools that use the types of VsWebSite.Interop.dll to move the code inside the method that uses the types to a new method and then handled gracefully the FileNotFoundException. For example:

public Collection References
{
   get
   {
      Collection references = new Collection();

      AddLangProjReferences(references);

      if (references.Count == 0)
      {
         try
         {
            AddWebSiteReferences(references);
         }
         catch (System.IO.FileNotFoundException)
         {
            // This can happen in VS 2017 if the web development workload is not installed 
         }
      }
      return references;
   }
}

I hope this post helps you. Happy coding!

Visual Studio 2017 RC announced. Extensions need some changes

Today at the Connect(); // 2016 conference Microsoft has announced the Release Candidate of Visual Studio 2017, formerly known as Visual Studio “15” whose last public beta was Preview 5. I think that this is going to be a great release, because Visual Studio 2015 was very heavy, bloated and slow unless you had a powerful machine and this new version has been greatly optimized and made granular so you only install the pieces (“workloads”) that you need.

To learn what’s new in VS 2017 RC read: Visual Studio 2017 RC

Now, if you are a developer of extensions for Visual Studio, you have work to do. Visual Studio 2017 introduces version 3.0 of the manifest (which is backwards compatible with previous versions) but requires that your extension declares the components required in the new modular setup.

To learn how to migrate your extension to VS 2017 read How to: Migrate Extensibility Projects to Visual Studio 2017.

To learn what’s new in the Visual Studio 2017 SDK read What’s New in the Visual Studio 2017 SDK.

See also:

FAQ for Visual Studio 2017 extensibility

Breaking Changes in Visual Studio 2017 extensibility

Ngen support in VSIX v3

Installing to external directories

Measuring extension impact in startup

The Visual Studio Gallery is also being revamped and renamed to Visual Studio Marketplace and you can manage your extension using the URL https://marketplace.visualstudio.com/manage, although some features are not migrated yet from the Visual Studio Gallery.

I have migrated my MZ-Tools extension to work with VS 2017 RC and I have sim-shipped it with Microsoft publishing it today on the Visual Studio Gallery/Marketplace. In a next post I will explain the issues that I have found in the process.

HOWTO: Diagnose a Visual Studio startup hang problem

For the most part, I love Visual Studio, but some weeks I hate it very deeply :-). In its current incarnation VS 2015, but also from its origins in VS.NET 2002, it is such a huge piece of software, composed of so many parts, that it’s quite fragile and not very resilient. Microsoft knows it and so it recommends to install betas and previews on non-production machines, that is, on virtual machines. Also, it is painfully slow to install unless your computer is fast and has a SSD. The other day I created a Hyper-V virtual machine on the Surface 4 Pro that I use at work to install VS “15” Preview 5. I don’t know how it happened exactly: I think that I deleted an existing Hyper-V virtual machine with the Visual Studio emulator for Android that I installed days ago for a Xamarin course and that I had to uninstall because in turn I had uninstalled Xamarin because it slowed my VS 2015 startup quite noticeably and Xamarin projects took minutes to create using the New Project menu (I want to love Xamarin, so I will use Xamarin Studio on my Mac). Anyway, my Surface laptop suffered a horrible BSOD at startup (APC_INDEX_MISMATCH or similar).

Update Nov 9, 2016: The BSOD crash APC_INDEX_MISMATCH was caused by an update to the Trend Micro Antivirus+ 2016. The solution is to update to Trend Micro Antivirus+ 2017, as explained in their web page Getting stuck on Windows Startup Repair after updating Trend Micro Security.

I could only recover it going back to a restore point. Visual Studio 2015 got an inconsistent state as a result. So I uninstalled it. And I uninstalled VS 2010 too, which anyway was suffering a crash for months each time I tried to show the properties page of any project. And I went to the Control Panel and I removed tons of stuff that were related to Visual Studio. But I forgot to delete the Visual Studio entries in the Registry and remaining folders on disk. When I reinstalled VS 2015 and launched it, the main window did not respond to mouse clicks, only a “ding” sound, as if it was shown an invisible modal dialog. So I uninstalled VS 2015 again and this time I deleted registry entries and remaining folders on disk. After reinstallation, just after the splash screen I got this empty modal dialog (and the main screen was not shown):

vs2015hang

I tried to uninstall, repair, execute devenv.exe with all kind of “reset” flags, etc. to no avail. Since the alternatives are to reinstall Windows, or to give up VS 2015 and wait for the RTM of next VS “15” version, I decided to troubleshoot the problem. There are at least three approaches to diagnose Visual Studio startup problems:

  • The first one is to use the own activity log of Visual Studio. To use this approach, click the Start button of Windows, type “Developer” and the result should appear in the first positions:

developercommandprompt

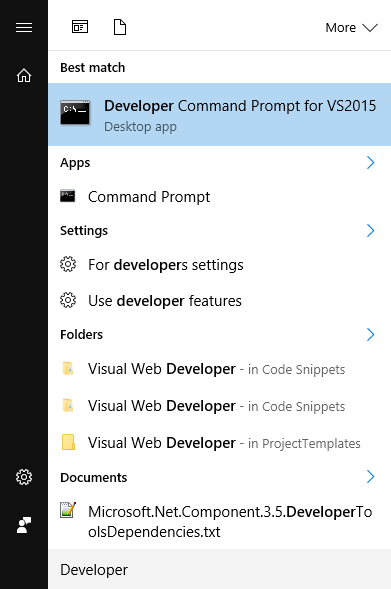
At the Developer Command Prompt, type:

devenv.exe /log C:\Users\<your user>\Desktop\MyVSLog.xml

developercommandpromptcommand

That will launch Visual Studio and will create the log on your desktop (by default Visual Studio would create it on another location). Close or kill Visual Studio and two files should appear on your desktop: MyVsLog.xml and ActivityLog.xsl.

The ActivityLog.xsl file is a XML stylesheet that allows the XML file to be viewed nicely formatted on a browser (the XML file has this line for this magic to work: <?xml-stylesheet type=”text/xsl” href=”ActivityLog.xsl”?>). In the output, focus first on red items:

connecteduserpackagefailedtoload

So, in my case the problem is:

Could not load file or assembly ‘Microsoft.VisualStudio.Services.Client, Version=14.0.0.0, Culture=neutral, PublicKeyToken=b03f5f7f11d50a3a’ or one of its dependencies. The system cannot find the file specified.
  • The second approach is to use the Assembly Binding Log Viewer (aka “fuslogvw”). This tool applies to any application that uses .NET (not only to Visual Studio) and allows you to know which assemblies couldn’t be loaded and which paths were probed. To launch it, open the Developer Command Prompt of the previous approach but this time with admin rights (right-click “Run as administrator”). Then click the Settings button:

assemblybindinglogviewersettings

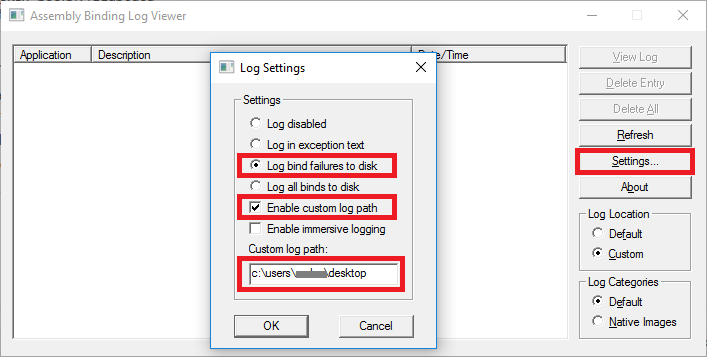
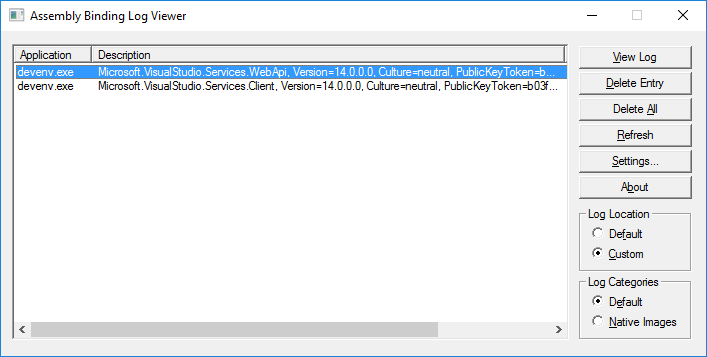
If the radiobuttons are disabled it means that it wasn’t launched with admin rights. Select the “Log bind failures to disk” and “Enable custom log path” settings, typing as custom log path “C:\Users\<your user>\Desktop”. Click the OK button, launch Visual Studio, and close or kill it once the error has happened. You will get some assembly binding failures:

assemblybindinglogviewerfailures

Important: do not forget to click the Settings button again and select the “Log disabled” setting.

In my case, I got binding failures  for the assembly:

Microsoft.VisualStudio.Services.WebApi, Version=14.0.0.0, Culture=neutral, PublicKeyToken=b03f5f7f11d50a3a

and:

Microsoft.VisualStudio.Services.Client, Version=14.0.0.0, Culture=neutral, PublicKeyToken=b03f5f7f11d50a3a

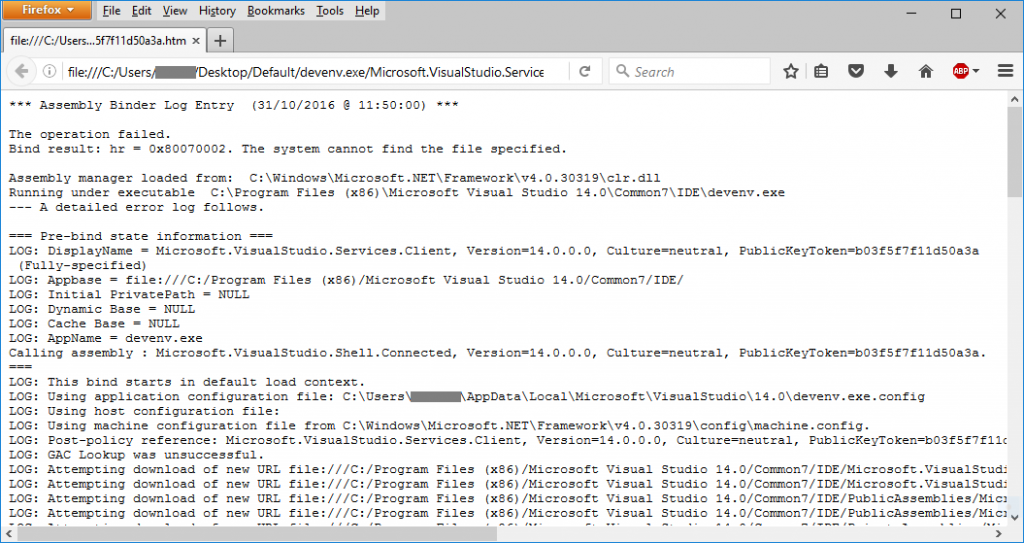
Clicking on any item of the list opens your browser with an .htm file with the details of the failure, the folders where it was searched for, etc.:

assemblybindinglogviewerfailuredetails

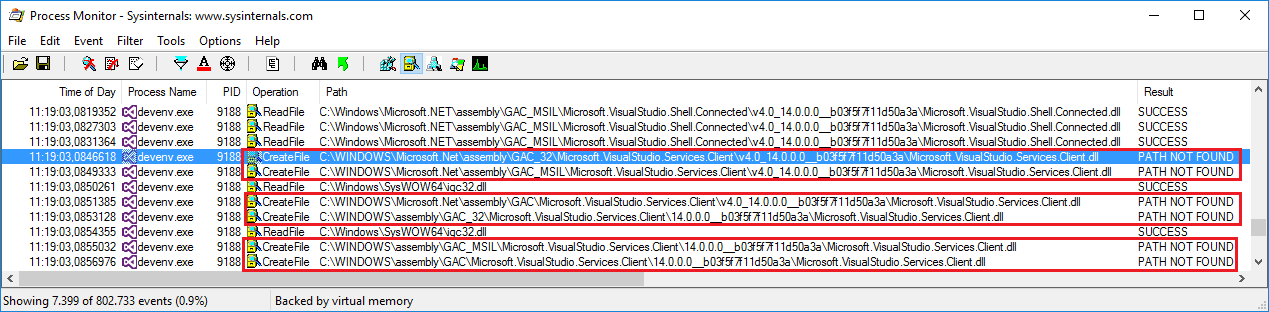
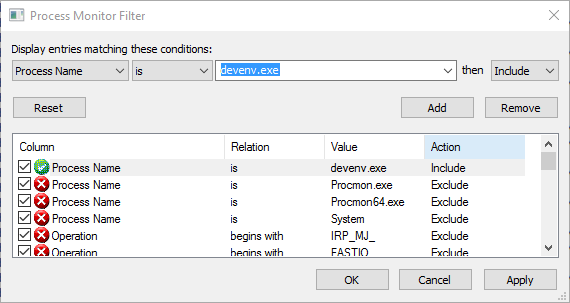
  • The third approach is using the Process Monitor tool by Microsoft (formerly by Sysinternals). This approach can be used with any application, managed (.NET- based) or native. It allows you to find failures locating files or registry entries. However, the volume of information can be very big, so it should be used as a last resort. To use it, when launched configure the filter to monitor only devenv.exe:

processmonitorfilter

And in the output you need to dig into the results finding PATH NOT FOUND or similar errors for files that never appear as SUCCESS:

processmonitorfilenotfound

So, using any of these approaches I know now that my Visual Studio installation doesn’t have the assemblies Microsoft.VisualStudio.Services.Client.dll and Microsoft.VisualStudio.Services.WebApi.dll. I haven’t solved the problem yet (the repair option of Visual Studio doesn’t reinstall them) but at least I have more information.

SAMPLE: How to create a Visual Studio context menu

For the sake of completeness, I have added another sample to the list of samples about creating top menus, submenus, toolbars, etc. that I created a few days ago on GitHub:

HOWTO: Create a Visual Studio context menu
Demonstrates how to create a context menu that is shown when right-clicking on a toolwindow. To show the toolwindow click the View > Other Windows > My toolwindow command.

contextmenu

contextmenudark

That is, in this case we don’t want to add a menu entry to an existing context menu, but we want to create a whole context menu with entries to be shown when right-clicking on something, typically a control of a modal dialog or a toolwindow that belongs to our package.

There are a couple of ways to accomplish this:

The first one is using automation (EnvDTE): you create by code a commandbar that you show using the CommandBar.ShowPopup method. This was the only approach for add-ins and you have a sample in the article HOWTO: Create a context menu using a Visual Studio commandbar popup from an add-in. Since packages can use DTE, this approach is suitable. The commandbar can even have menu entries without an underlying command. But this approach is not the focus of this post.

The second one, only for packages, is using a .vsct file. The Menu element of the .vsct file can be of several kinds, and one of them is “Context”. Then you add commands to it through a group, like any other type of menu. But how is shown?. You need to use either the IOleComponentUIManager.ShowContextMenu method or the IVsUIShell.ShowContextMenu method. I have used the latter method, which receives several parameters such as the Guid of the command set, the Id of the context menu (both defined in the .vsct file) and the point where to show it.

The sample also shows the correct approach to initialize the usercontrol of a toolwindow (to pass it the package). Take into account that a toolwindow in Visual Studio can be shown in two cases:

  1. Clicking the command that shows the toolwindow.
  2. Automatically when Visual Studio is launched if the toolwindow was shown when Visual Studio was closed the last time. Visual Studio is smart enough to know the package owner of the toolwindow to show, then it loads the package and shows the toolwindow.

The initialization of the usercontrol cannot be done in the constructor of the toolwindow when the usercontrol is created because at that point the base.Package is null in the case 2:

public MyToolWindow() : base(null)
{
   this.Caption = "My toolwindow";

   m_toolWindowControl = new ToolWindowControl();

   this.Content = m_toolWindowControl;
}

Instead, you need to override the OnToolWindowCreated method since at this point the base.Package is already initialized:

public override void OnToolWindowCreated()
{
   VSPackageContextMenu package;

   base.OnToolWindowCreated();

   package = (VSPackageContextMenu)base.Package;

   m_toolWindowControl.Initialize(package);
}

The strange case of VBA / VB6 editor prompting to repair Visual Studio (revisited 3rd time)

This is the nth time that I find this problem (and I am not the only one), so I am going to document in this 3rd post another cause for it, that happens on Window 10. The problem is that suddenly, the VBA editor of Office or VB6 prompts you to repair some version of Visual Studio. In this case, VB6 prompts to repair Visual Studio 2005 (that I have installed on my main development machine) but it can also happen with Visual Studio 2010, etc.:

vb6prompttorepair

I already talked about this back in 2012, where the root cause was the installation of Visual Studio from a removable hard disk (since then I always copy the setups of Visual Studio to the fixed hard drive before installing) and in 2014, where the cause was the deletion of partition D: of the hard disk (actually a variation of the previous cause). In both cases I was unable to fix the problem until I uninstalled all versions of Visual Studio and reinstalled them, which for a developer of extensions like me that need all Visual Studio versions to test is the most painful experience.

Since I adopted Windows 10 as my main OS, I have seen this problem twice, in 2015 and in 2016, and it has the same cause in both cases as I will explain, but different to the ones of 2014 and 2012. To diagnose this issue, you need to follow the procedure explained by Heath Stewart in his blog. So I started looking for events with ID 1001:

eventviewer1001

As you can see, the error doesn’t tell you exactly which is missing. The events with ID 1004 provide the actual cause:

eventviewer1004

So, the file C:\Windows\Microsoft.NET\Framework\v2.0.50727\RedistList\VSList.xml is missing. This is a file likely installed by Visual Studio inside a folder that belongs to the .NET Framework, not to Visual Studio. I would say this is a bad idea. And it is not the only .xml file installed by Visual Studio, there are a lot of them.

But which is the root cause that makes that a file suddenly disappears from that folder? It is the installation of the major updates of Windows 10: Update “1511” in November 2015 and “Anniversary Update” 1607 in October 2016. As you know, the next one announced a couple of days ago will be “Creators Update” in 2017 and the issue will reappear in 3D ;-). Each time that a major Windows 10 update is installed, the previous Windows installation is stored in a backup folder “Windows.old” (which includes the .NET Frameworks folders, and the .xml files in question). It seems that the Windows 10 update is smart to detect that you had .NET Framework 2.0 installed (it’s an optional feature of Windows 10, not installed by default) and it installs it for you, but not smart enough to detect the missing files. So, alas, the .xml files are not restored and cause this issue. In 2015 I still had the Windows.old backup folder and I was able to restore all the missing .xml files using BeyondCompare, the folder comparison utility that I love. Now in 2016 I deleted the Windows.old backup folder before I realized the issue, so I had to provide the .msi files to the prompt dialog, copying them to the hard disk before, of course!

I hope this helps you if you encounter this issue.

The strange case of System.NotImplementedException “The method or operation is not implemented.” using SQL Server database projects

Yesterday I got a bug report from a user of my MZ-Tools package for Visual Studio 2015:

System.NotImplementedException “The method or operation is not implemented.”

The exception happened calling the EnvDTE.ProjectItem.IsOpen Property (viewKind) method when using SQL Server Database Projects provided by SQL Server Data Tools (SSDT):

databaseproject

As you may know, SQL Server Database projects are quite good automation-friendly projects, that is, they implement EnvDTE interfaces (EnvDTE.Project, EnvDTE.ProjectItem, etc.) so you don’t need to use the low level IVsHierarchy, etc. interfaces of Visual Studio. But somehow, they missed to implement something somewhere.

I tried to reproduce the problem on my side to no avail. My extension worked happily with the .sql files (EnvDTE.ProjectItem) of that kind of project. So, which kind of EnvDTE.ProjectItem didn’t implement the IsOpen property? The user sent me a helpful clue: he was using a database reference. I was not aware of that thing, but certainly in SQL Server database projects you can add references to databases:

databasereference

And as soon as I added a reference to the “master” database, I could reproduce the problem. So, my extension was treating the ProjectItem nodes below the References node as files that could be “opened”, and the ProjectItem.IsOpen method was not implemented (which is certainly right). But, how is that the nodes below the References node were being processed for database projects (which is incorrect) while they were not processed for regular (C#, VB.NET) projects?. The reason is that for regular projects, the EnvDTE.Project.ProjectItems collection of the project doesn’t return the References node, which is correct. For database projects, the EnvDTE.Project.ProjectItems collection does return the References node, which is a bug. I wanted to verify that the internal implementation of database projects has this bug so I used .NET Reflector to see the internals of the Microsoft.VisualStudio.Data.Tools.Package.dll package and I found that there is a ReferenceContainerNode type that has a GetAutomationObject that returns an OAReferenceFolderItem instance:

getautomationobject

There shouldn’t be a folder for references in the automation model (EnvDTE). The automation model provides the VSLangProj.References collection to handle the references of a project. I won’t report the bug because there is an almost zero chance of Microsoft fixing it, and anyway I needed to find a fix for the current version of the SQL Server Data Tools, which took me to the next problem: how can an extension identify reliably the “References” ProjectItem?.

I could check if the Name property of the ProjectItem is “References”, but that approach is always prone to errors due to localization (in Spanish would be “Referencias”). The SQL Server Data Tools doesn’t seem to be localized, but I wanted to investigate another approaches. It happens that the IVsHierarchy of the References node implements an interface named IReferenceContainer. So, one could cast that node to IReferenceContainer and if the cast is successful then it’s the References node. Alas, that interface is declared internally in database projects, and in MPF.Project.NonShipping.dll for other projects. At the end, I opted for getting the EnvDTE.ProjectItem.Object property, convert it to a string, and compare it to “Microsoft.VisualStudio.Data.Tools.Package.Internal.OAReferences”, which is as bad as comparing the Name to “References”, but anyway, it works for now.

VS SDK, packages, add-ins, macros and more…